1.3.2.1. Terraform基础概念——状态管理
我们在第一章的末尾提过,当我们成功地执行了一次terraform apply,创建了期望的基础设施以后,我们如果再次执行terraform apply,生成的新的执行计划将不会包含任何变更,Terraform会记住当前基础设施的状态,并将之与代码所描述的期望状态进行比对。第二次apply时,因为当前状态已经与代码描述的状态一致了,所以会生成一个空的执行计划。
1.3.2.1.1. 初探状态文件
在这里,Terraform引入了一个独特的概念——状态管理,这是Ansible等配置管理工具或是自研工具调用SDK操作基础设施的方案所没有的。简单来说,Terraform将每次执行基础设施变更操作时的状态信息保存在一个状态文件中,默认情况下会保存在当前工作目录下的terraform.tfstate文件里。例如我们在代码中声明一个data和一个resource:
data "ucloud_images" "default" {
  availability_zone = "cn-sh2-01"
  name_regex        = "^CentOS 6.5 64"
  image_type        = "base"
}

resource "ucloud_vpc" "vpc" {
  cidr_blocks = ["10.0.0.0/16"]
  name = "my-vpc"
}
使用terraform apply后,我们可以看到terraform.tfstate的内容:
{
  "version": 4,
  "terraform_version": "0.13.5",
  "serial": 54,
  "lineage": "a0d89a84-ae5b-8e14-d61b-2d9885e3359a",
  "outputs": {},
  "resources": [
    {
      "mode": "data",
      "type": "ucloud_images",
      "name": "default",
      "provider": "provider[\"registry.terraform.io/ucloud/ucloud\"]",
      "instances": [
        {
          "schema_version": 0,
          "attributes": {
            "availability_zone": "cn-sh2-01",
            "id": "1693951353",
            "ids": [
              "uimage-xiucsl"
            ],
            "image_id": null,
            "image_type": "base",
            "images": [
              {
                "availability_zone": "cn-sh2-01",
                "create_time": "2020-01-09T11:30:34+08:00",
                "description": "",
                "features": [
                  "NetEnhanced",
                  "CloudInit"
                ],
                "id": "uimage-xiucsl",
                "name": "CentOS 6.5 64位",
                "os_name": "CentOS 6.5 64位",
                "os_type": "linux",
                "size": 20,
                "status": "Available",
                "type": "base"
              }
            ],
            "most_recent": false,
            "name_regex": "^CentOS 6.5 64",
            "os_type": null,
            "output_file": null,
            "total_count": 1
          }
        }
      ]
    },
    {
      "mode": "managed",
      "type": "ucloud_vpc",
      "name": "vpc",
      "provider": "provider[\"registry.terraform.io/ucloud/ucloud\"]",
      "instances": [
        {
          "schema_version": 0,
          "attributes": {
            "cidr_blocks": [
              "10.0.0.0/16"
            ],
            "create_time": "2020-11-16T17:00:40+08:00",
            "id": "uvnet-lu2vcdds",
            "name": "my-vpc",
            "network_info": [
              {
                "cidr_block": "10.0.0.0/16"
              }
            ],
            "remark": null,
            "tag": "Default",
            "update_time": "2020-11-16T17:00:40+08:00"
          },
          "private": "bnVsbA=="
        }
      ]
    }
  ]
}
我们可以看到,查询到的data以及创建的resource信息都被以json格式保存在tfstate文件里。
我们前面已经说过,由于tfstate文件的存在,我们在terraform apply之后立即再次apply是不会执行任何变更的,那么如果我们删除了这个tfstate文件,然后再执行apply会发生什么呢?Terraform读取不到tfstate文件,会认为这是我们第一次创建这组资源,所以它会再一次创建代码中描述的所有资源。更加麻烦的是,由于我们前一次创建的资源所对应的状态信息被我们删除了,所以我们再也无法通过执行terraform destroy来销毁和回收这些资源,实际上产生了资源泄漏。所以妥善保存这个状态文件是非常重要的。
另外,如果我们对Terraform的代码进行了一些修改,导致生成的执行计划将会改变状态,那么在实际执行变更之前,Terraform会复制一份当前的tfstate文件到同路径下的terraform.tfstate.backup中,以防止由于各种意外导致的tfstate损毁。
在Terraform发展的极早期,HashiCorp曾经尝试过无状态文件的方案,也就是在执行Terraform变更计划时,给所有涉及到的资源都打上特定的tag,在下次执行变更时,先通过tag读取相关资源来重建状态信息。但因为并不是所有资源都支持打tag,也不是所有公有云都支持多tag,所以Terraform最终决定用状态文件方案。
还有一点,HashiCorp官方从未公开过tfstate的格式,也就是说,HashiCorp保留随时修改tfstate格式的权力。所以不要试图手动或是用自研代码去修改tfstate,Terraform命令行工具提供了相关的指令(我们后续会介绍到),请确保只通过命令行的指令操作状态文件。
1.3.2.1.2. 极其重要的安全警示——tfstate是明文的
关于Terraform状态,还有极其重要的事,所有考虑在生产环境使用Terraform的人都必须格外小心并再三警惕:Terraform的状态文件是明文的,这就意味着代码中所使用的一切机密信息都将以明文的形式保存在状态文件里。例如我们回到创建UCloud主机的例子:
data "ucloud_security_groups" "default" {
  type = "recommend_web"
}

data "ucloud_images" "default" {
  availability_zone = "cn-sh2-02"
  name_regex        = "^CentOS 6.5 64"
  image_type        = "base"
}

resource "ucloud_instance" "normal" {
  availability_zone = "cn-sh2-02"
  image_id          = data.ucloud_images.default.images[0].id
  instance_type     = "n-basic-2"
  root_password     = "supersecret1234"
  name              = "tf-example-normal-instance"
  tag               = "tf-example"
  boot_disk_type    = "cloud_ssd"
  security_group = data.ucloud_security_groups.default.security_groups[0].id
  delete_disks_with_instance = true
}
我们在代码中明文传入了root_password的值是supersecret1234,执行了terraform apply后我们观察tfstate文件中相关段落:
{
      "mode": "managed",
      "type": "ucloud_instance",
      "name": "normal",
      "provider": "provider[\"registry.terraform.io/ucloud/ucloud\"]",
      "instances": [
        {
          "schema_version": 0,
          "attributes": {
            "allow_stopping_for_update": null,
            "auto_renew": false,
            "availability_zone": "cn-sh2-02",
            "boot_disk_size": 20,
            "boot_disk_type": "cloud_ssd",
            "charge_type": null,
            "cpu": 2,
            "cpu_platform": "Intel/Broadwell",
            "create_time": "2020-11-16T18:06:32+08:00",
            "data_disk_size": null,
            "data_disk_type": null,
            "data_disks": [],
            "delete_disks_with_instance": true,
            "disk_set": [
              {
                "id": "bsi-krv0ilrc",
                "is_boot": true,
                "size": 20,
                "type": "cloud_ssd"
              }
            ],
            "duration": null,
            "expire_time": "1970-01-01T08:00:00+08:00",
            "id": "uhost-u2byoz4i",
            "image_id": "uimage-ku3uri",
            "instance_type": "n-basic-2",
            "ip_set": [
              {
                "internet_type": "Private",
                "ip": "10.25.94.58"
              }
            ],
            "isolation_group": "",
            "memory": 4,
            "min_cpu_platform": null,
            "name": "tf-example-normal-instance",
            "private_ip": "10.25.94.58",
            "remark": "",
            "root_password": "supersecret1234",
            "security_group": "firewall-a0lqq3r3",
            "status": "Running",
            "subnet_id": "subnet-0czucaf2",
            "tag": "tf-example",
            "timeouts": null,
            "user_data": null,
            "vpc_id": "uvnet-0noi3kun"
          },
          "private": "eyJlMmJmYjczMC1lY2FhLTExZTYtOGY4OC0zNDM2M2JjN2M0YzAiOnsiY3JlYXRlIjoxODAwMDAwMDAwMDAwLCJkZWxldGUiOjYwMDAwMDAwMDAwMCwidXBkYXRlIjoxMjAwMDAwMDAwMDAwfX0=",
          "dependencies": [
            "data.ucloud_images.default",
            "data.ucloud_security_groups.default"
          ]
        }
      ]
    }
可以看到root_password的值supersecret1234是以明文形式被写在tfstate文件里的。这是Terraform从设计之初就确定的,并且在可见的未来不会有改善。不论你是在代码中明文硬编码,还是使用参数(variable,我们之后的章节会介绍),亦或是妙想天开地使用函数在运行时从外界读取,都无法改变这个结果。
解决之道有两种,一种是使用Vault或是AWS Secret Manager这样的动态机密管理工具生成临时有效的动态机密(比如有效期只有5分钟,即使被他人读取到,机密也早已失效);另一种就是我们下面将要介绍的——Terraform Backend。
1.3.2.1.3. 生产环境的tfstate管理方案——Backend
到目前为止我们的tfstate文件是保存在当前工作目录下的本地文件,假设我们的计算机损坏了,导致文件丢失,那么tfstate文件所对应的资源都将无法管理,而产生资源泄漏。
另外如果我们是一个团队在使用Terraform管理一组资源,团队成员之间要如何共享这个状态文件?能不能把tfstate文件签入源代码管理工具进行保存?
把tfstate文件签入管代码管理工具是非常错误的,这就好比把数据库签入了源代码管理工具,如果两个人同时签出了同一份tfstate,并且对代码做了不同的修改,又同时apply了,这时想要把tfstate签入源码管理系统可能会遭遇到无法解决的冲突。
为了解决状态文件的存储和共享问题,Terraform引入了远程状态存储机制,也就是Backend。Backend是一种抽象的远程存储接口,如同Provider一样,Backend也支持多种不同的远程存储服务:
Terraform Remote Backend分为两种:
- 标准:支持远程状态存储与状态锁
- 增强:在标准的基础上支持远程操作(在远程服务器上执行plan、apply等操作)
目前增强型Backend只有Terraform Cloud云服务一种。
状态锁是指,当针对一个tfstate进行变更操作时,可以针对该状态文件添加一把全局锁,确保同一时间只能有一个变更被执行。不同的Backend对状态锁的支持不尽相同,实现状态锁的机制也不尽相同,例如consul backend就通过一个.lock节点来充当锁,一个.lockinfo节点来描述锁对应的会话信息,tfstate文件被保存在backend定义的路径节点内;s3 backend则需要用户传入一个Dynamodb表来存放锁信息,而tfstate文件被存储在s3存储桶里。名为etcd的backend对应的是etcd v2,它不支持状态锁;etcdv3则提供了对状态锁的支持,等等等等。读者可以根据实际情况,挑选自己合适的Backend。接下来我将以consul为范例为读者演示Backend机制。
1.3.2.1.4. Consul简介以及安装
Consul是HashiCorp推出的一个开源工具,主要用来解决服务发现、配置中心以及Service Mesh等问题;Consul本身也提供了类似ZooKeeper、Etcd这样的分布式键值存储服务,具有基于Gossip协议的最终一致性,所以可以被用来充当Terraform Backend存储。
安装Consul十分简单,如果你是Ubuntu用户:
curl -fsSL https://apt.releases.hashicorp.com/gpg | sudo apt-key add -
sudo apt-add-repository "deb [arch=amd64] https://apt.releases.hashicorp.com $(lsb_release -cs) main"
sudo apt-get update && sudo apt-get install -y consul
对于CentOS用户:
sudo yum install -y yum-utils
sudo yum-config-manager --add-repo https://rpm.releases.hashicorp.com/RHEL/hashicorp.repo
sudo yum -y install consul
对于Macos用户:
brew tap hashicorp/tap
brew install hashicorp/tap/consul
对于Windows用户,如果按照前文安装Terraform教程已经配置了Chocolatey的话:
choco install consul
安装完成后的验证:
$ consul
Usage: consul [--version] [--help] <command> [<args>]

Available commands are:
    acl            Interact with Consul's ACLs
    agent          Runs a Consul agent
    catalog        Interact with the catalog
    config         Interact with Consul's Centralized Configurations
    connect        Interact with Consul Connect
    debug          Records a debugging archive for operators
    event          Fire a new event
    exec           Executes a command on Consul nodes
    force-leave    Forces a member of the cluster to enter the "left" state
    info           Provides debugging information for operators.
    intention      Interact with Connect service intentions
    join           Tell Consul agent to join cluster
    keygen         Generates a new encryption key
    keyring        Manages gossip layer encryption keys
    kv             Interact with the key-value store
    leave          Gracefully leaves the Consul cluster and shuts down
    lock           Execute a command holding a lock
    login          Login to Consul using an auth method
    logout         Destroy a Consul token created with login
    maint          Controls node or service maintenance mode
    members        Lists the members of a Consul cluster
    monitor        Stream logs from a Consul agent
    operator       Provides cluster-level tools for Consul operators
    reload         Triggers the agent to reload configuration files
    rtt            Estimates network round trip time between nodes
    services       Interact with services
    snapshot       Saves, restores and inspects snapshots of Consul server state
    tls            Builtin helpers for creating CAs and certificates
    validate       Validate config files/directories
    version        Prints the Consul version
    watch          Watch for changes in Consul
安装完Consul后,我们可以启动一个测试版Consul服务:
$ consul agent -dev
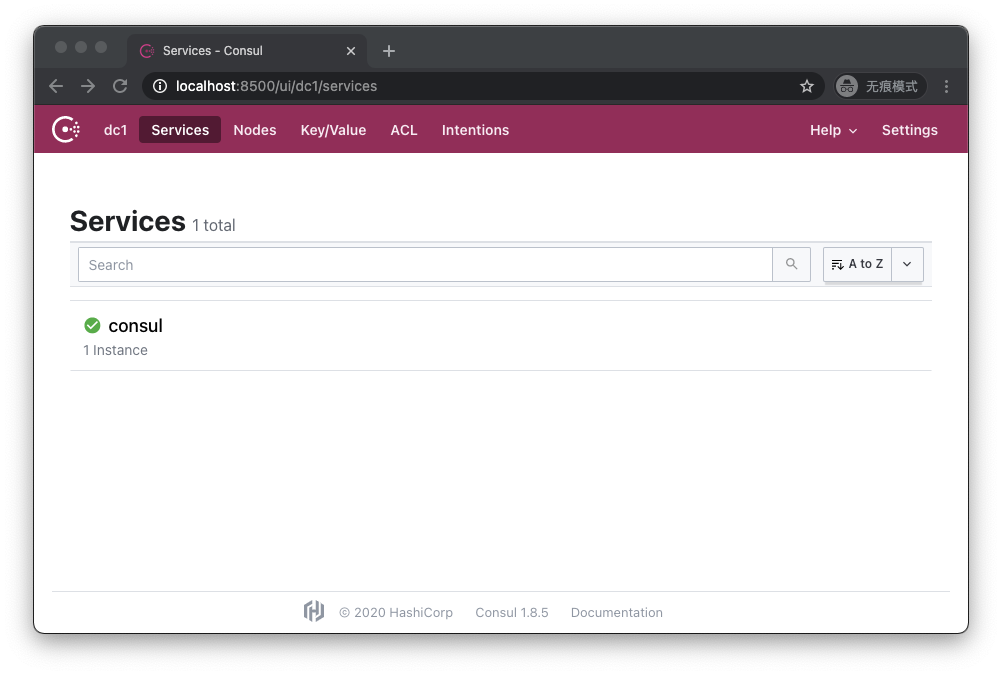
Consul会在本机8500端口开放Http终结点,我们可以通过浏览器访问http://localhost:8500 :
1.3.2.1.5. 使用Backend
我们写一个可以免费执行的简单Terraform代码:
terraform {
  required_version = "~>0.13.5"
  required_providers {
    ucloud = {
      source  = "ucloud/ucloud"
      version = ">=1.22.0"
    }
  }
  backend "consul" {
    address = "localhost:8500"
    scheme  = "http"
    path    = "my-ucloud-project"
  }
}

provider "ucloud" {
  public_key  = "JInqRnkSY8eAmxKFRxW9kVANYThfIW9g2diBbZ8R8"
  private_key = "8V5RClzreyKBxrJ2GsePjfDYHy55yYsIIy3Qqzjjah0C0LLxhXkKSzEKFWkATqu4U"
  project_id  = "org-a2pbab"
  region      = "cn-sh2"
}

resource "ucloud_vpc" "vpc" {
  cidr_blocks = ["10.0.0.0/16"]
}
注意要把代码中的public_key、private_key和project_id换成你自己的。
在terraform节中,我们添加了backend配置节,指定使用localhost:8500为地址(也就是我们刚才启动的测试版Consul服务),指定使用http协议访问该地址,指定tfstate文件存放在Consul键值存储服务的my-ucloud-project路径下。
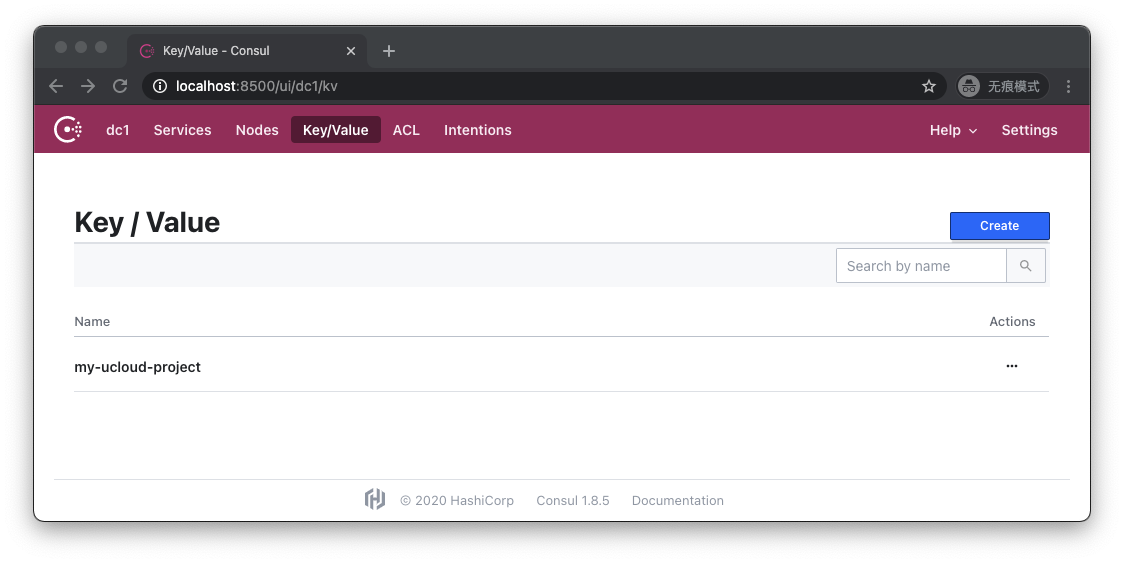
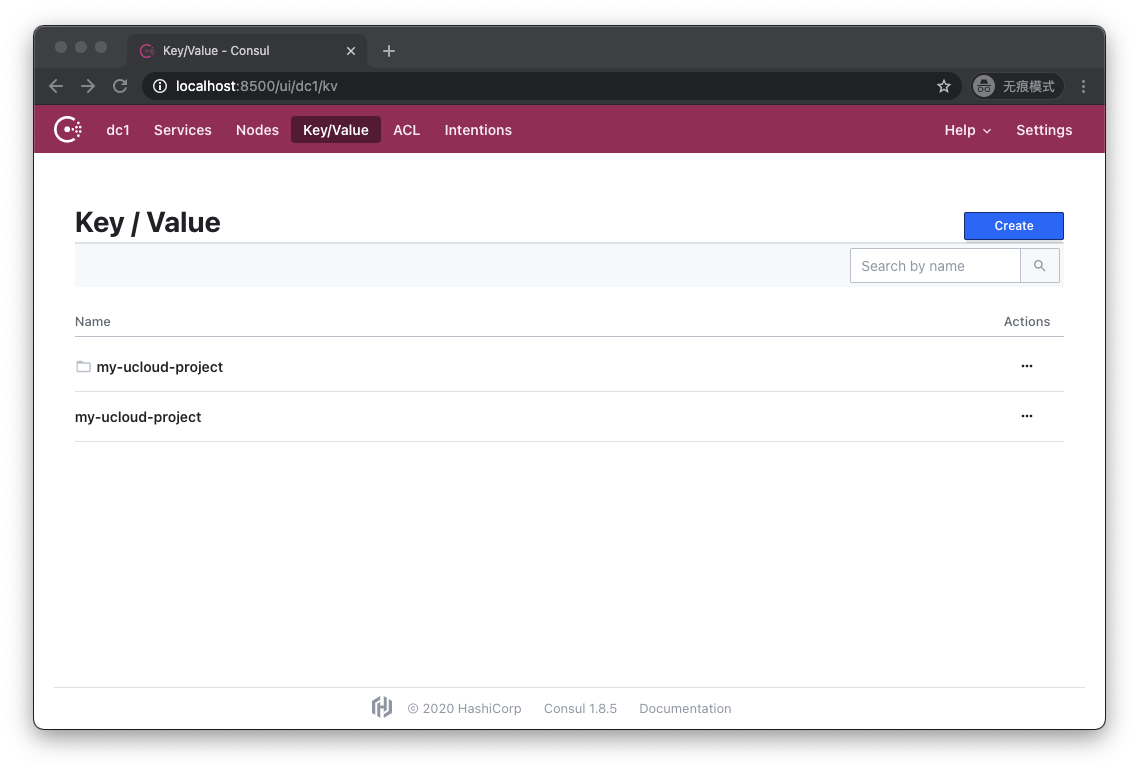
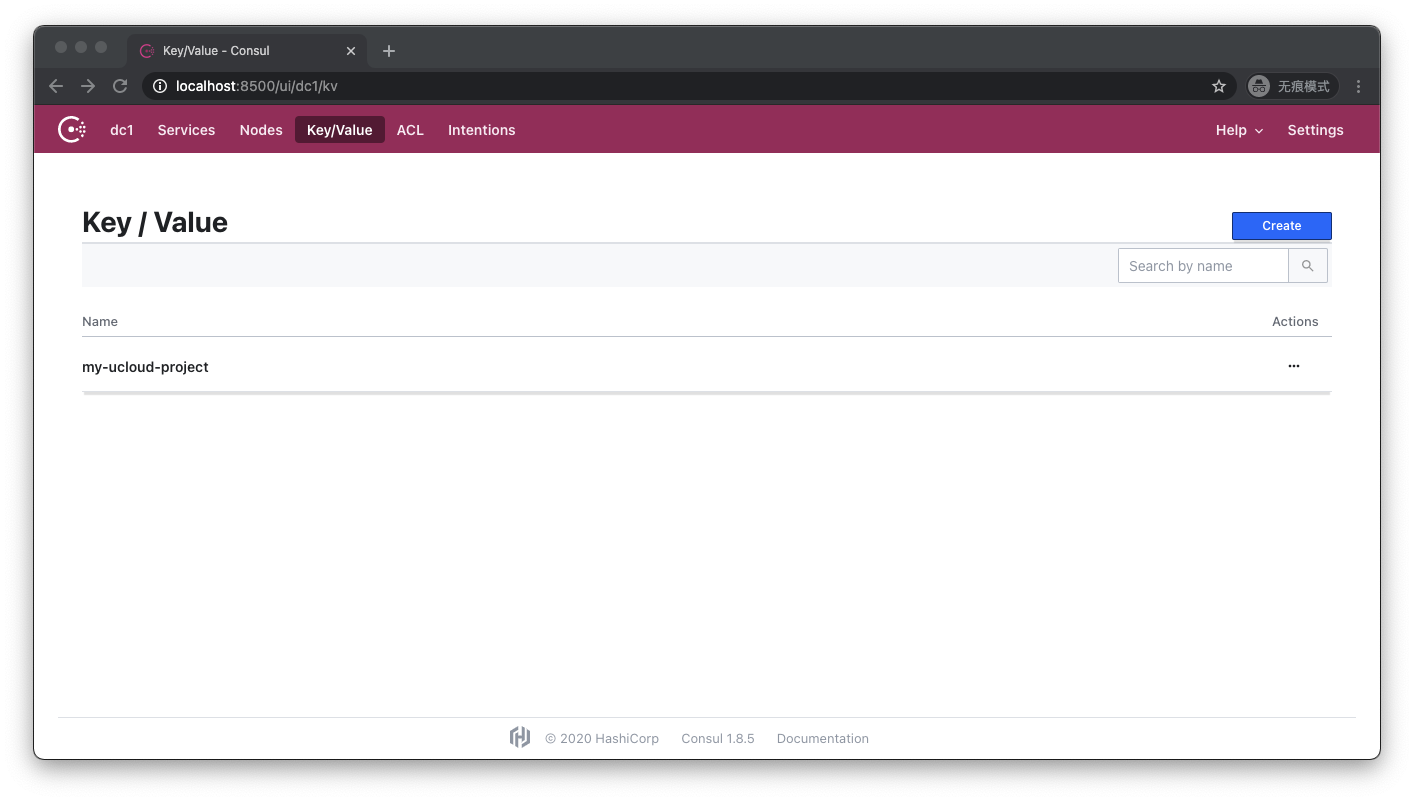
当我们执行完terraform apply后,我们访问http://localhost:8500/ui/dc1/kv :

可以看到my-ucloud-project,点击进入:
可以看到,原本保存在工作目录下的tfstate文件的内容,被保存在了Consul的名为my-ucloud-project的键下。
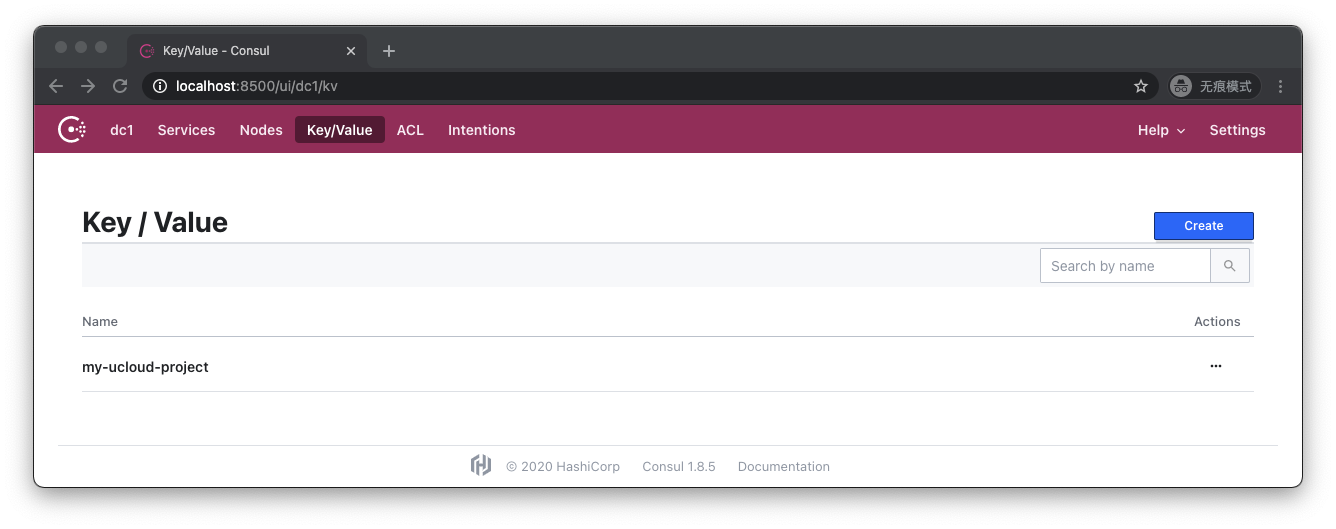
让我们执行terraform destroy后,重新访问http://localhost:8500/ui/dc1/kv :
可以看到,my-ucloud-project这个键仍然存在。让我们点击进去:
可以看到,它的内容为空,代表基础设施已经被成功销毁。
1.3.2.1.6. 观察锁文件
那么在这个过程里,锁究竟在哪里?我们如何能够体验到锁的存在?让我们对代码进行一点修改:
terraform {
  required_version = "~>0.13.5"
  required_providers {
    ucloud = {
      source  = "ucloud/ucloud"
      version = ">=1.22.0"
    }
  }
  backend "consul" {
    address = "localhost:8500"
    scheme  = "http"
    path    = "my-ucloud-project"
  }
}

provider "ucloud" {
  public_key  = "JInqRnkSY8eAmxKFRxW9kVANYThfIW9g2diBbZ8R8"
  private_key = "8V5RClzreyKBxrJ2GsePjfDYHy55yYsIIy3Qqzjjah0C0LLxhXkKSzEKFWkATqu4U"
  project_id  = "org-a2pbab"
  region      = "cn-sh2"
}

resource "ucloud_vpc" "vpc" {
  cidr_blocks = ["10.0.0.0/16"]
  provisioner "local-exec" {
    command = "sleep 1000"
  }
}
这次的变化是我们在ucloud_vpc的定义上添加了一个local-exec类型的provisioner。provisioner我们在后续的章节中会专门叙述,在这里读者只需要理解,Terraform进程在成功创建了该VPC后,会在执行Terraform命令行的机器上执行一条命令:sleep 1000,这个时间足以将Terraform进程阻塞足够长的时间,以便让我们观察锁信息了。
让我们执行terraform apply,这一次apply将会被sleep阻塞,而不会成功完成:
An execution plan has been generated and is shown below.
Resource actions are indicated with the following symbols:
  + create

Terraform will perform the following actions:

  # ucloud_vpc.vpc will be created
  + resource "ucloud_vpc" "vpc" {
      + cidr_blocks  = [
          + "10.0.0.0/16",
        ]
      + create_time  = (known after apply)
      + id           = (known after apply)
      + name         = (known after apply)
      + network_info = (known after apply)
      + remark       = (known after apply)
      + tag          = "Default"
      + update_time  = (known after apply)
    }

Plan: 1 to add, 0 to change, 0 to destroy.

Do you want to perform these actions?
  Terraform will perform the actions described above.
  Only 'yes' will be accepted to approve.

  Enter a value: yes

ucloud_vpc.vpc: Creating...
ucloud_vpc.vpc: Provisioning with 'local-exec'...
ucloud_vpc.vpc (local-exec): Executing: ["/bin/sh" "-c" "sleep 1000"]
ucloud_vpc.vpc: Still creating... [10s elapsed]
...
让我们重新访问http://localhost:8500/ui/dc1/kv :
这一次情况发生了变化,我们看到除了my-ucloud-project这个键之外,还多了一个同名的文件夹。让我们点击进入文件夹:

在这里我们成功观测到了.lock和.lockinfo文件。让我们点击.lock看看:
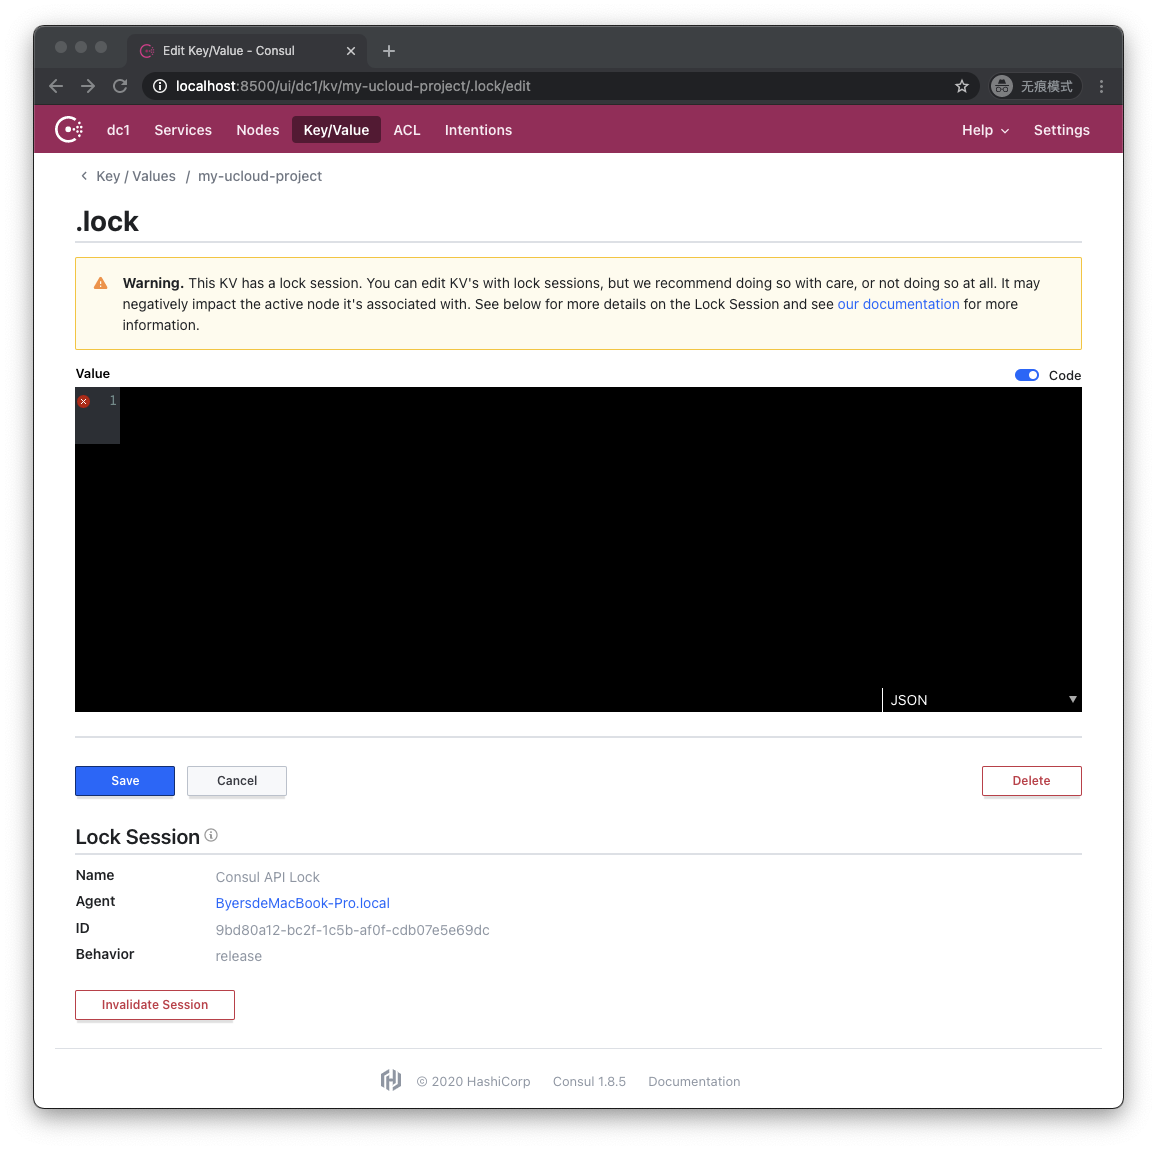
Consul UI提醒我们,该键值对目前正被锁定,而它的内容是空。让我们查看.lockinfo的内容:
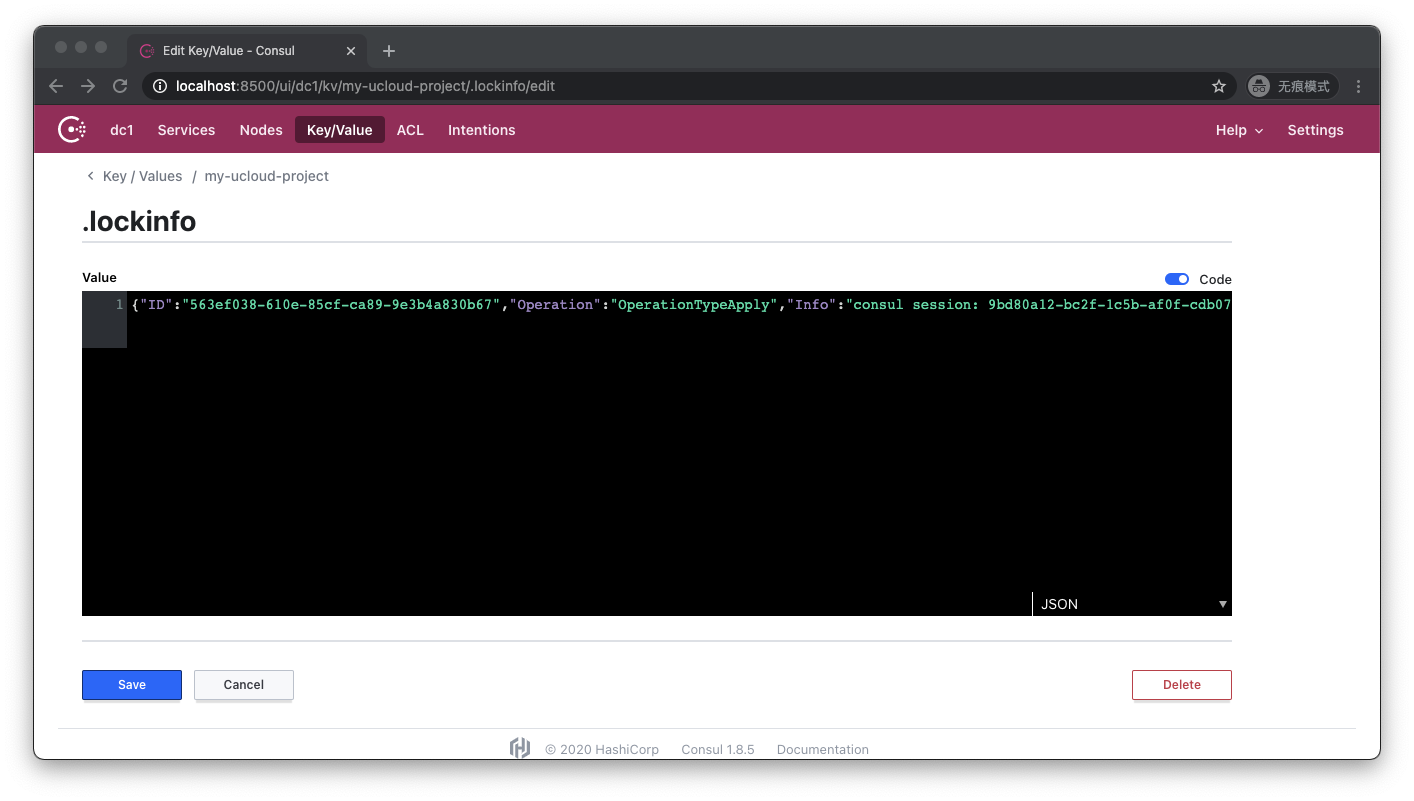
.lockinfo里记录了锁ID、我们执行的操作,以及其他的一些信息。
让我们另起一个新的命令行窗口,在同一个工作目录下尝试另一次执行terraform apply:
$ terraform apply
Acquiring state lock. This may take a few moments...

Error: Error locking state: Error acquiring the state lock: Lock Info:
  ID:        563ef038-610e-85cf-ca89-9e3b4a830b67
  Path:      my-ucloud-project
  Operation: OperationTypeApply
  Who:       byers@ByersMacBook-Pro.local
  Version:   0.13.5
  Created:   2020-11-16 11:53:50.473561 +0000 UTC
  Info:      consul session: 9bd80a12-bc2f-1c5b-af0f-cdb07e5e69dc


Terraform acquires a state lock to protect the state from being written
by multiple users at the same time. Please resolve the issue above and try
again. For most commands, you can disable locking with the "-lock=false"
flag, but this is not recommended.
可以看到,同时另一个人试图对同一个tfstate执行变更的尝试失败了,因为它无法顺利获取到锁。
让我们用ctrl-c终止原先被阻塞的terraform apply的执行,然后重新访问http://localhost:8500/ui/dc1/kv :
可以看到,包含锁的文件夹消失了。Terraform命令行进程在接收到ctrl-c信号时,会首先把当前已知的状态信息写入Backend内,然后释放Backend上的锁,再结束进程。但是如果Terraform进程是被强行杀死,或是机器掉电,那么在Backend上就会遗留一个锁,导致后续的操作都无法执行,这时我们需要用terraform force-unlock命令强行删除锁,我们将在后续的章节中详细叙述。
1.3.2.1.7. 小贴士——假如一开始Backend配置写错了会怎么样
让我们假设我们拥有一个干净的工作目录,我们新建了一个main.tf代码文件,在terraform配置节当中配置了如下backend:
backend "consul" {
    address = "localhost:8600"
    scheme  = "http"
    path    = "my-ucloud-project"
}
我们把address参数写错了,端口号从8500写成了8600,这是我们执行一次terraform init:
$ terraform init

Initializing the backend...

Successfully configured the backend "consul"! Terraform will automatically
use this backend unless the backend configuration changes.

Error: Failed to get existing workspaces: Get "http://localhost:8600/v1/kv/my-ucloud-project-env:?keys=&separator=%2F": EOF
并不奇怪,Terraform抱怨无法连接到localhost:8600。这时我们把backend配置的端口纠正回8500,重新执行init看看:
$ terraform init

Initializing the backend...
Backend configuration changed!

Terraform has detected that the configuration specified for the backend
has changed. Terraform will now check for existing state in the backends.


Error: Error inspecting states in the "consul" backend:
    Get "http://localhost:8600/v1/kv/my-ucloud-project-env:?keys=&separator=%2F": EOF

Prior to changing backends, Terraform inspects the source and destination
states to determine what kind of migration steps need to be taken, if any.
Terraform failed to load the states. The data in both the source and the
destination remain unmodified. Please resolve the above error and try again.
还是错误,Terraform还是试图连接localhost:8600,并且这次的报错信息提示我们需要帮助它解决错误,以便它能够决定如何进行状态数据的迁移。
这是因为Terraform发现Backend的配置发生了变化,所以它尝试从原先的Backend读取状态数据,并且尝试将之迁移到新的Backend,但因为原先的Backend是错的,所以它会再次抱怨连接不上localhost:8500。

如果我们检查此时的工作目录下的.terraform目录,会看到其中多了一个本地的terraform.tfstate。检查它的内容:
{
    "version": 3,
    "serial": 2,
    "lineage": "aa296584-3606-f9b0-78da-7c5563b46c7b",
    "backend": {
        "type": "consul",
        "config": {
            "access_token": null,
            "address": "localhost:8600",
            "ca_file": null,
            "cert_file": null,
            "datacenter": null,
            "gzip": null,
            "http_auth": null,
            "key_file": null,
            "lock": null,
            "path": "my-ucloud-project",
            "scheme": "http"
        },
        "hash": 3939494596
    },
    "modules": [
        {
            "path": [
                "root"
            ],
            "outputs": {},
            "resources": {},
            "depends_on": []
        }
    ]
}
可以看到它把最初的Backend配置记录在了里面,地址仍然是localhost:8600,这就导致了我们即使修正了Backend配置,也无法成功init。在这个场景下,解决方法也很简单,直接删除这个本地tfstate文件即可。
这个小问题引出了我们的下一个话题——状态迁移。
1.3.2.1.8. 状态迁移
让我们先重启一下测试版Consul服务,清除旧有的状态。假如我们一开始没有声明backend:
terraform {
  required_version = "~>0.13.5"
  required_providers {
    ucloud = {
      source  = "ucloud/ucloud"
      version = ">=1.22.0"
    }
  }
}

provider "ucloud" {
  public_key  = "JInqRnkSY8eAmxKFRxW9kVANYThfIW9g2diBbZ8R8"
  private_key = "8V5RClzreyKBxrJ2GsePjfDYHy55yYsIIy3Qqzjjah0C0LLxhXkKSzEKFWkATqu4U"
  project_id  = "org-a2pbab"
  region      = "cn-sh2"
}

resource "ucloud_vpc" "vpc" {
  cidr_blocks = ["10.0.0.0/16"]
}
然后我们执行terraform init,继而执行terraform apply,那么我们将成功创建云端资源,并且在工作目录下会有一个terraform.tfstate文件:
{
  "version": 4,
  "terraform_version": "0.13.5",
  "serial": 1,
  "lineage": "a0335546-0039-cccc-467b-5dc3050c8212",
  "outputs": {},
  "resources": [
    {
      "mode": "managed",
      "type": "ucloud_vpc",
      "name": "vpc",
      "provider": "provider[\"registry.terraform.io/ucloud/ucloud\"]",
      "instances": [
        {
          "schema_version": 0,
          "attributes": {
            "cidr_blocks": [
              "10.0.0.0/16"
            ],
            "create_time": "2020-11-16T22:24:38+08:00",
            "id": "uvnet-ssgiofxv",
            "name": "tf-vpc-20201116142437539000000001",
            "network_info": [
              {
                "cidr_block": "10.0.0.0/16"
              }
            ],
            "remark": null,
            "tag": "Default",
            "update_time": "2020-11-16T22:24:38+08:00"
          },
          "private": "bnVsbA=="
        }
      ]
    }
  ]
}
随后我们加上了之前写过的指向本机测试Consul服务的backend声明,然后执行terraform init:
$ terraform init

Initializing the backend...
Do you want to copy existing state to the new backend?
  Pre-existing state was found while migrating the previous "local" backend to the
  newly configured "consul" backend. No existing state was found in the newly
  configured "consul" backend. Do you want to copy this state to the new "consul"
  backend? Enter "yes" to copy and "no" to start with an empty state.

  Enter a value: yes
Terraform成功地检测到backend类型从local变为了consul,并且确认了Consul里同名路径下没有状态文件存在,于是Terraform可以替我们把本机的状态文件迁移到新的Backend里,但这需要我们手工确认。输入yes并且回车:
Enter a value: yes


Successfully configured the backend "consul"! Terraform will automatically
use this backend unless the backend configuration changes.

Initializing provider plugins...
- Using previously-installed ucloud/ucloud v1.22.0

Terraform has been successfully initialized!

You may now begin working with Terraform. Try running "terraform plan" to see
any changes that are required for your infrastructure. All Terraform commands
should now work.

If you ever set or change modules or backend configuration for Terraform,
rerun this command to reinitialize your working directory. If you forget, other
commands will detect it and remind you to do so if necessary.
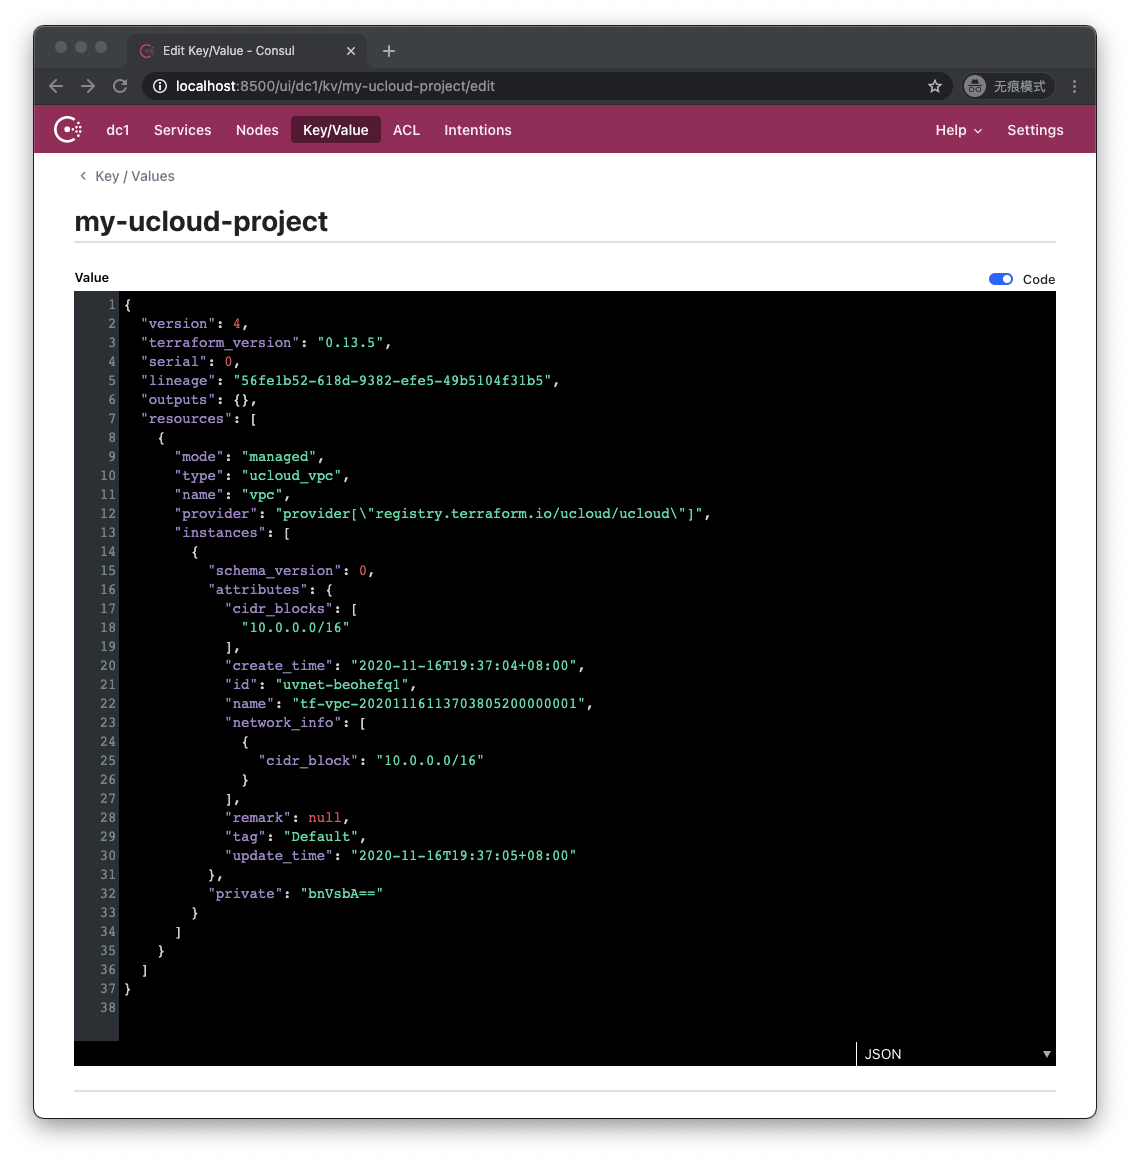
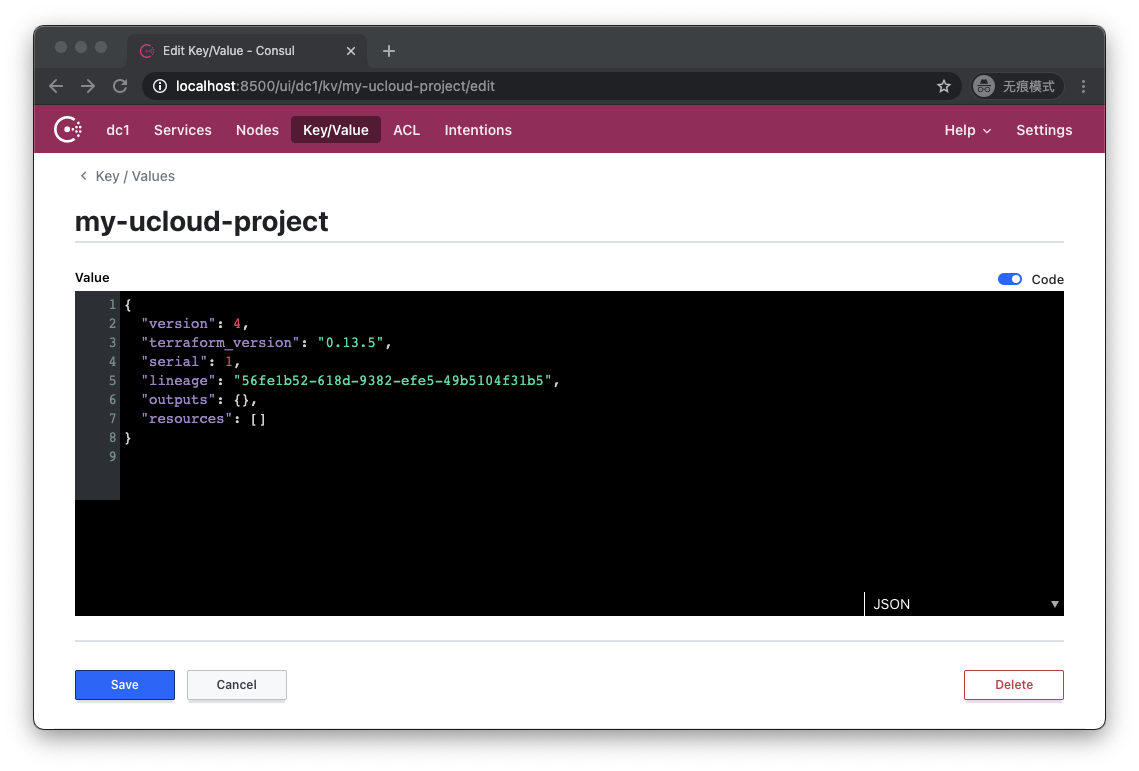
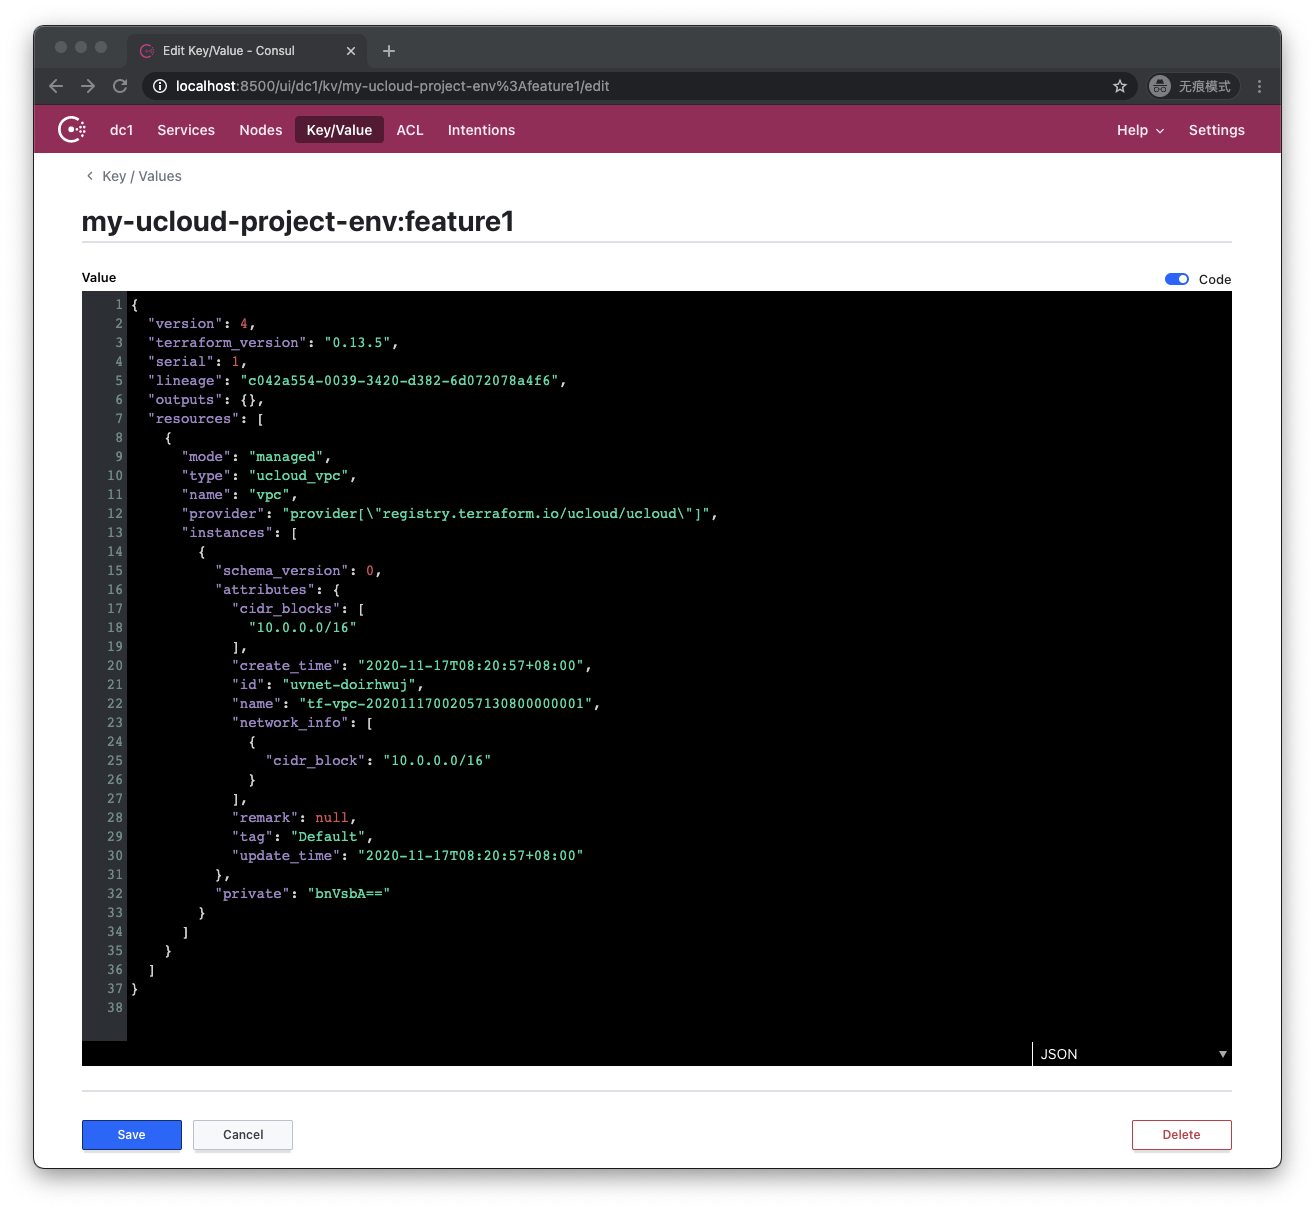
这时让我们访问http://localhost:8500/ui/dc1/kv/my-ucloud-project/edit :
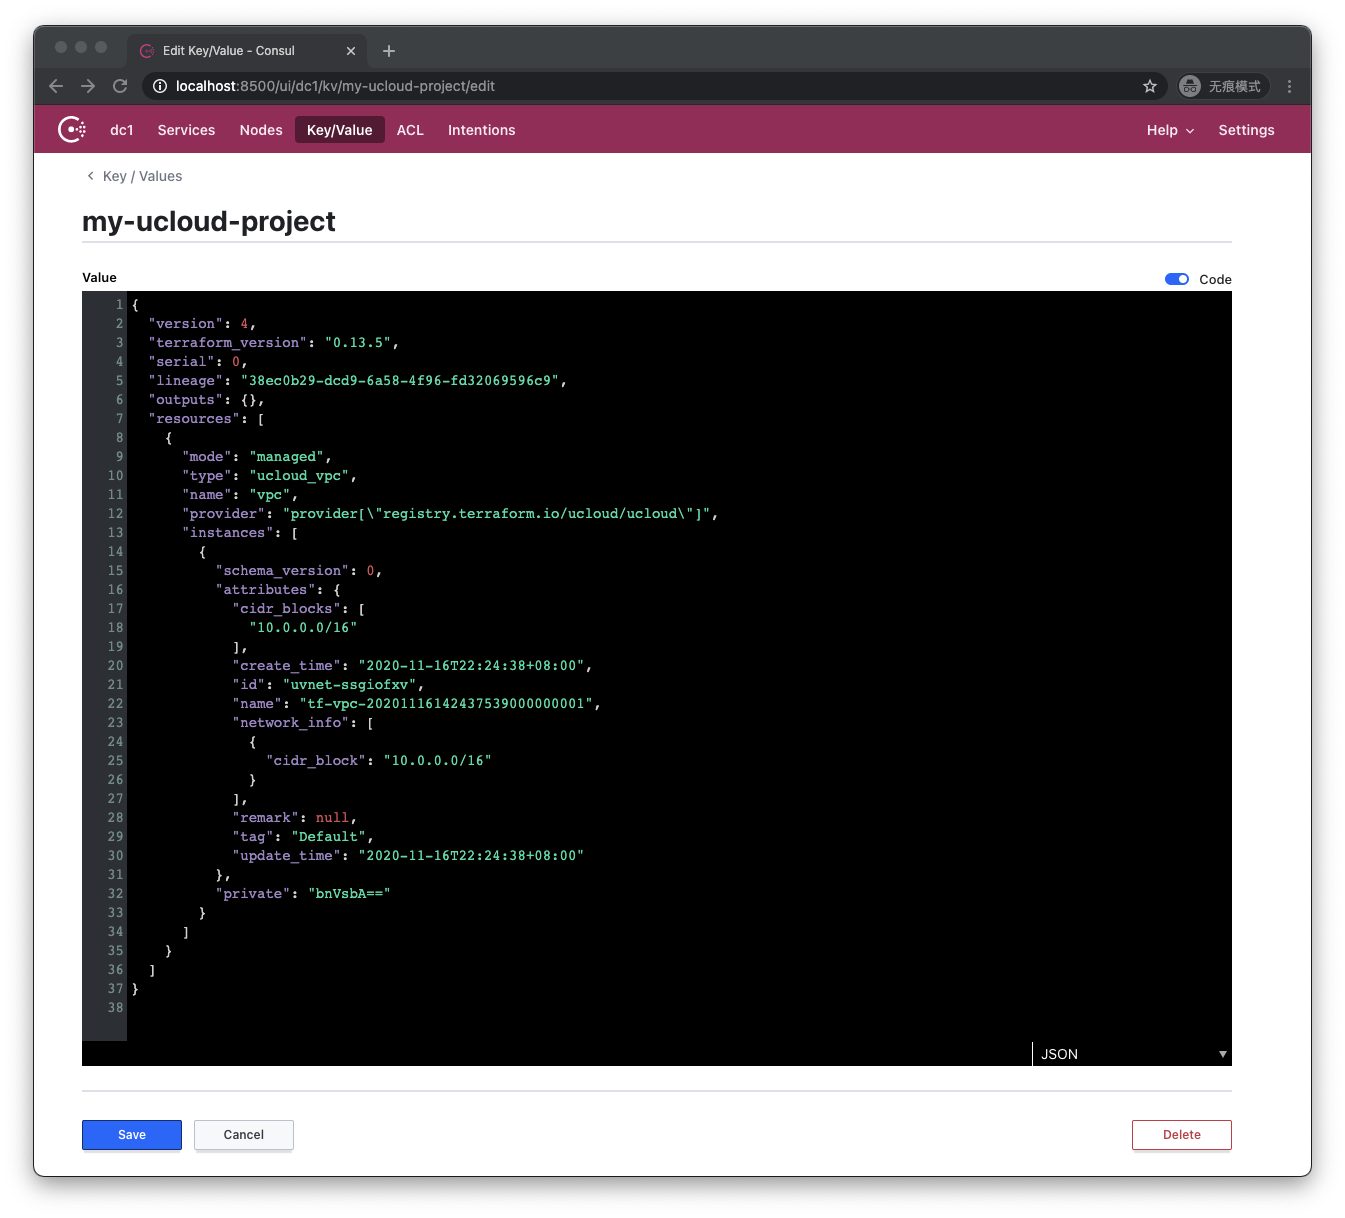
本机的状态数据被成功地迁移到了Consul里(虽然和本机的文件并不完全相同,但状态数据是相同的)。
那假如试图迁移状态时,新backend的目标路径上已经存在其他tfstate会发生什么呢?我们简单地说一下结果,就是Terraform会把我们的tfstate和新backend上既有的其他tfstate下载到本机的一个临时目录下,然后要求我们人工核对以后决定是否覆盖既有的tfstate。
1.3.2.1.9. Backend配置的动态赋值
有些读者会注意到,到目前为止我所写的代码里的配置项基本都是硬编码的,Terraform是否支持运行时用变量动态赋值?答案是支持的,Terraform可以通过variable变量来传值给provider、data和resource。
但有一个例外,那就是backend配置。backend配置只允许硬编码,或者不传值。
这个问题是因为Terraform运行时本身设计的运行顺序导致的,一直到2019年05月官方才给出了解决方案,那就是“部分配置“(partial configuration)。
简单来说就是我们可以在tf代码的backend声明中不给出具体的配置:
terraform {
  required_version = "~>0.13.5"
  required_providers {
    ucloud = {
      source  = "ucloud/ucloud"
      version = ">=1.22.0"
    }
  }
  backend "consul" {

  }
}
而在另一个独立的文件中给出相关配置,例如我们在工作目录下创建一个名为backend.hcl的文件:
address = "localhost:8500"
scheme  = "http"
path    = "my-ucloud-project"
本质上我们就是把原本属于backend consul节的属性赋值代码搬迁到一个独立的hcl文件内,然后我们执行terraform init时附加backend-config参数:
$ terraform init -backend-config=backend.hcl
这样也可以初始化成功。通过这种打补丁的方式,我们可以复用他人预先写好的Terraform代码,在执行时把属于我们自己的Backend配置信息以独立的backend-config文件的形式传入来进行初始化。
1.3.2.1.10. Backend的权限控制以及版本控制
Backend本身并没有设计任何的权限以及版本控制,这方面完全依赖于具体的Backend实现。以AWS S3为例,我们可以针对不同的Bucket设置不同的IAM,用以防止开发测试人员直接操作生产环境,或是给予部分人员对状态信息的只读权限;另外我们也可以开启S3的版本控制功能,以防我们错误修改了状态文件(Terraform命令行有修改状态的相关指令)。
1.3.2.1.11. 状态的隔离存储
我们讲完Backend,现在要讨论另一个问题。假设我们的Terraform代码可以创建一个通用的基础设施,比如说是云端的一个eks、aks集群,或者是一个基于S3的静态网站,那么我们可能要为很多团队创建并维护这些相似但要彼此隔离的Stack,又或者我们要为部署的应用维护开发、测试、预发布、生产四套不同的部署。那么该如何做到不同的部署,彼此状态文件隔离存储和管理呢?
一种简单的方法就是分成不同的文件夹存储。
我们可以把不同产品不同部门使用的基础设施分成不同的文件夹,在文件夹内维护相同的代码文件,配置不同的backend-config,把状态文件保存到不同的Backend上。这种方法可以给予最大程度的隔离,缺点是我们需要拷贝许多份相同的代码。
第二种更加轻量级的方法就是Workspace。注意,Terraform开源版的Workspace与Terraform Cloud云服务的Workspace实际上是两个不同的概念,我们这里介绍的是开源版的Workspace。
Workspace允许我们在同一个文件夹内,使用同样的Backend配置,但可以维护任意多个彼此隔离的状态文件。还是我们刚才那个使用测试Consul服务作为Backend的例子:
当前我们有一个状态文件,名字是my-ucloud-project。然后我们在工作目录下执行这样的命令:
$ terraform workspace new feature1
Created and switched to workspace "feature1"!

You're now on a new, empty workspace. Workspaces isolate their state,
so if you run "terraform plan" Terraform will not see any existing state
for this configuration.
通过调用workspace命令,我们成功创建了名为feature1的Workspace。这时我们观察.terraform文件夹:
.terraform
├── environment
├── modules
│   └── modules.json
└── plugins
    ├── registry.terraform.io
    │   ├── ucloud
......
我们会发现多了一个environment文件,它的内容是feature1。这实际上就是Terraform用来保存当前上下文环境使用的是哪个Workspace的文件。
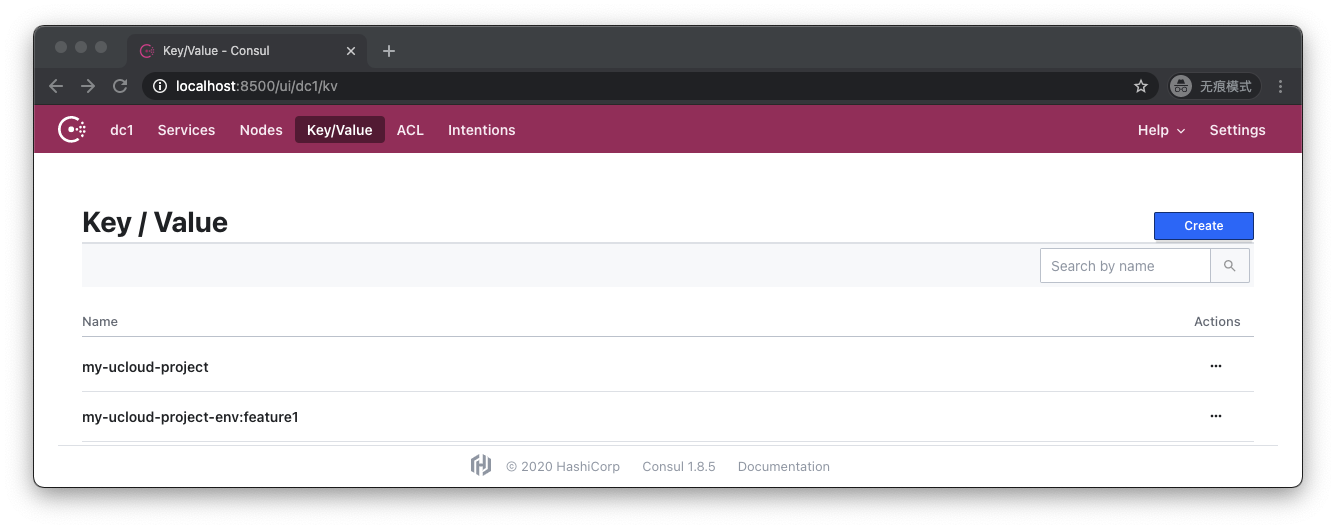
重新观察Consul存储会发现多了一个文件:my-ucloud-project-env:feature1。这就是Terraform为feature1这个Workspace创建的独立的状态文件。让我们执行一下apply,然后再看这个文件的内容:
可以看到,状态被成功写入了feature1的状态文件。
我们可以通过以下命令来查询当前Backend下所有的Workspace:
$ terraform workspace list
  default
* feature1
我们有default和feature1两个Workspace,当前我们工作在feature1上。我们可以用以下命令切换回default:
$ terraform workspace select default
Switched to workspace "default".
我们可以用以下命令确认我们成功切换回了default:
$ terraform workspace show
default
我们可以用以下命令删除feature1:
$ terraform workspace delete feature1
Deleted workspace "feature1"!
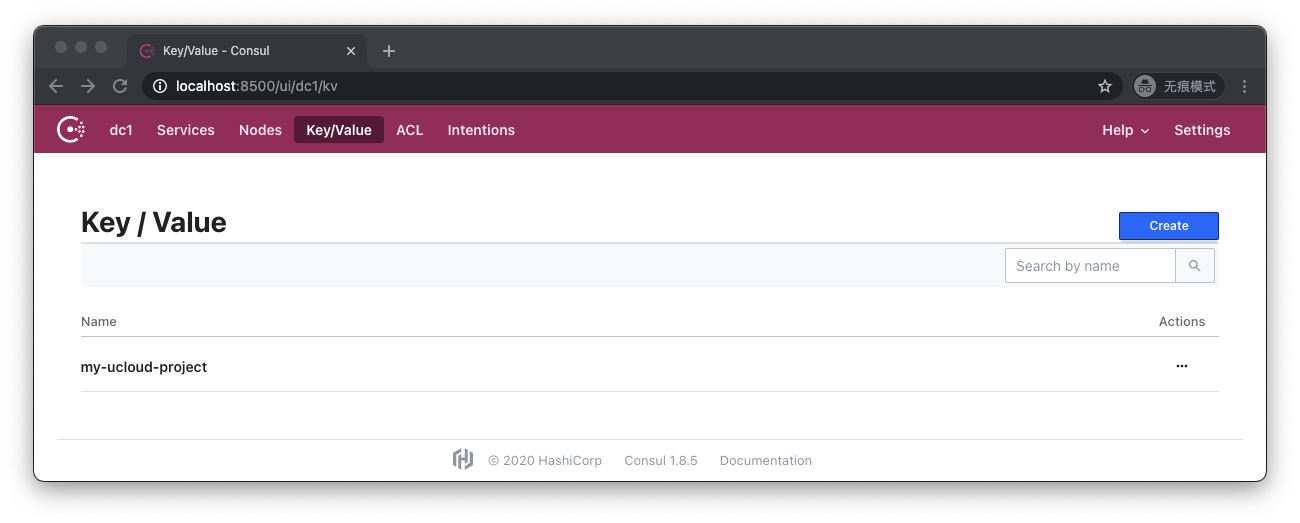
再观察Consul存储,就会发现feature1的状态文件被删除了:
目前支持多工作区的Backend有:
- AzureRM
- Consul
- COS
- GCS
- Kubernetes
- Local
- Manta
- Postgres
- Remote
- S3
1.3.2.1.12. 该使用哪种隔离
相比起多文件夹隔离的方式来说,基于Workspace的隔离更加简单,只需要保存一份代码,在代码中不需要为Workspace编写额外代码,用命令行就可以在不同工作区之间来回切换。
但是Workspace的缺点也同样明显,由于所有工作区的Backend配置是一样的,所以有权读写某一个Workspace的人可以读取同一个Backend路径下所有其他Workspace;另外Workspace是隐式配置的(调用命令行),所以有时人们会忘记自己工作在哪个Workspace下。
Terraform官方为Workspace设计的场景是:有时开发人员想要对既有的基础设施做一些变更,并进行一些测试,但又不想直接冒险修改既有的环境。这时他可以利用Workspace复制出一个与既有环境完全一致的平行环境,在这个平行环境里做一些变更,并进行测试和实验工作。
Workspace对应的源代码管理模型里的主干——分支模型,如果团队希望维护的是不同产品之间不同的基础设施,或是开发、测试、预发布、生产环境,那么最好还是使用不同的文件夹以及不同的backend-config进行管理。